Managing Connectors
This section describes how you can create and manage your connectors.
As a reminder, connectors are the way users define the data sources to which the masking engine should connect. Connectors are grouped within environments. In order to navigate to the connectors screen, click on an environment and then click the Connector tab.
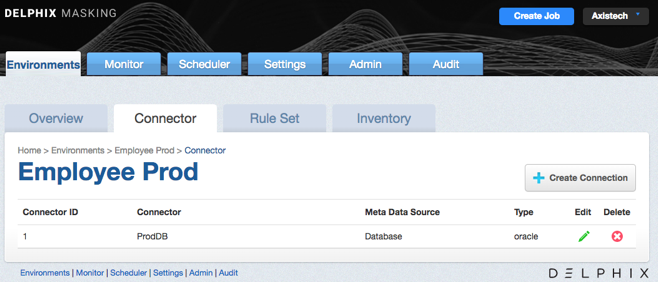
The connectors screen contains the following information and actions:
-
Connector ID — The numeric ID of the connector used to refer to the connector from the Masking API.
-
Connector — The name of the connector.
-
Meta Data Source — The type of connector. One of Database, File, or Mainframe.
-
Type — The specific type of connector.
-
Edit — Edit the connector. See more details below.
-
Delete — Delete the connector. See more details below.
The connectors on the screen can be sorted by the various informational fields by clicking on the respective field.
Creating a Connector
To create a new connector:
-
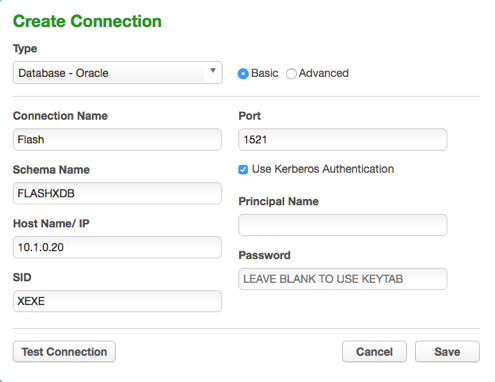
In the upper right-hand corner of the Connector tab, click Create Connection. The Create Connection window appears, prompting you for connection information for the data source you would like to connect to. The required information will change depending on the Type of data source you select. For more details on what info is needed to connect to different types (Oracle, AWS RDS, etc) see sections below.
-
Several of our connector types offer two different modes of connecting, Basic and Advanced Mode. Advanced Mode gives you the ability to specify the exact JDBC URL and add parameters that may not be available in Basic Mode.
The fields that appear on the Connector screen are specific to the selected Connector Type (see Connector Types below).
-
Click Save.
Editing a Connector
To edit a connector:
-
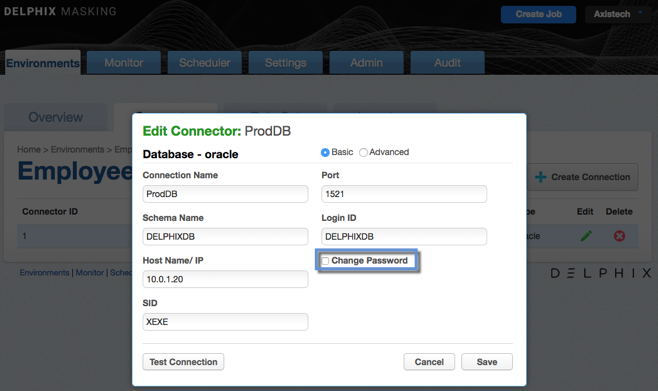
In the Connector tab, click the Edit icon for the connector you want to edit.
-
Change any information necessary. To change the password:
-
Select the checkbox next to Change Password.
-
In the field that appears, enter the new password.
-
-
Click Save.
Deleting a Connector
To delete a connector, click the Delete icon to the far right of the connector name.
Warning: When you delete a connector, you also delete its rule sets and inventory data.
Connector Types
Database Connectors
The fields that appear are specific to the DBMS Type you select. If you need assistance determining these values, please contact your database administrator.
You can only create connectors for the databases and/or files listed. If your database or file type is not listed here, you cannot create a connector for it.
-
Connection Type — (Oracle, MS SQL Server, and Sybase only) Choose a connection type:
-
Basic — Basic connection information.
-
Advanced — The full JDBC connect string including any database parameters.
-
-
Connection Name — The name of the database connector (specific for your Delphix application).
-
Schema Name — The schema that contains the tables that this connector will access.
-
Database Name — The name of the database to which you are connecting.
-
Host Name/ IP — The network host name or IP address of the database server.
-
Use Kerberos Authentication - (Oracle only, optional) Whether to use kerberos to authenticate to the database. This box is clear by default. Before Kerberos may be used, the appliance must be properly configured - refer to these instructions (link to appliance kerberos configuration instructions[1]). If this box is checked, the application authenticates with the kerberos KDC before connecting to the database, then uses its kerberos credentials to authenticate to the database instead of a login/password. When kerberos is enabled, the "Login ID" field is treated as the kerberos user principal name. The password, if supplied, is used to authenticate the user principal with the KDC. The password field may be left blank if the keytab set during appliance configuration contains keys for the user principal.
-
Login ID — The user login this connector will use to connect to the database (not applicable to Kerberos Authentication).
-
Password — The password associated with the Login ID or Username. (This password is stored encrypted.)
-
Principal Name - (Kerberos Authentication only) The name of the Kerberos user principal to use when authenticating with the KDC. The realm portion of the principal may be omitted if it matches the configured default realm.
-
Service Principal - (Sybase with Use Kerberos Authentication only) The name of the Sybase service instance.
-
Port — The TCP port of the server.
-
SID — (Oracle only) Oracle System ID (SID).
-
Instance Name — (MS SQL Server only) The name of the instance. This is optional. If the instance name is specified, the connector ignores the specified "Port" and attempts to connect to the "SQL Server Browser Service" on port 1434 to retrieve the connection information for the SQL Server instance. If the instance name is provided, be sure to make exceptions in the firewall for port 1434 as well as the particular port that the SQL Server instance listens to.
-
Custom Driver Name — (Generic only) The name of the JDBC driver class, including Java package name.
-
JDBC URL — (Generic and Advanced connector mode for Oracle, MS SQL Server, and Sybase only) The custom JDBC URL, typically including hostname/IP and port number.
All database types have a Test Connection button at the bottom left of the New Connector window. We highly recommend that you test your connection before you save it. Do so before you leave this window. When you click Test Connection, Delphix uses the information in the form to attempt a database connection. When finished, a status message appears indicating success or failure.
File Connectors
The values that appear correlate to the File Type you select.
-
Connector Name — The name of the file connector (specific to your Delphix application and unrelated to the file itself).
-
Connection Mode — SFTP, FTP
-
Path — The path to the directory where the file(s) are located.
-
Server Name — The name of the server used to connect to the file.
-
Port — The port used to connect to the server.
-
User Name — The user name to connect to the server.
-
Password — (non-Public Key Authentication only) The associated password for the server.
-
Public Key Authentication — (Optional) (Only appears for SFTP.) Check this box to specify a public key. When you check this box, the Available Keys dropdown appears. Choose a key from the dropdown. See Delphix Masking APIs for information on uploading public keys to the masking engine.
Note: If you plan to do on-the-fly masking then you will need to create a separate environment and connector to be the source for the files to be masked. The masked files will get put into the directory pointed to by the connector you created previously (the target). However, the file path specified in the connector of the target rule set must point to an existing file the target directory. It does not have to be a copy of the file, just an entry in the directory with the same name. It will be replaced by the masked file.