Managing Inventories
Managing Inventories
An inventory describes all of the data present in a particular ruleset and defines the methods which will be used to secure it. Inventories typically include the table or file name, column/field name, the data classification, and the chosen algorithm.
The Inventory Screen
From anywhere within an environment, click the Inventory tab to see the Inventory Screen. This displays the inventory for the environment's rule sets.
Inventory Settings
To specify your inventory settings:
- On the left-hand side of the screen, select a Rule Set from the drop-down menu.
- Below this, Contents lists all the tables or files defined for the ruleset.

- Select a table or file for which you want to create or edit the inventory of sensitive data. The Columns or Fields for that specific table or file appear.
- If a column is a primary key (PK), Foreign Key (FK), or index (IDX), an icon indicating this will appear to the Right of the column name. If there is a note for the column, a Note icon will appear. To read the note, click the icon.
- If you selected a table, metadata for the column appears: Data Type and Length (in parentheses). This information is read-only.
- Choose how you would like to view the inventory:
- All Fields — Displays all columns in the table or all fields in the file (allowing you to mark new columns or fields to be masked).
- Masked Fields — Filters the list to just those columns or fields that are already marked for masking.
- Auto — The default value. The profiling job can determine or update the algorithm assigned to a column and whether to mask the column.
- User — The user's choice overrides the profiling job. The user manually updates the algorithm assignment, mask/unmask option of the column. The Profiler will ignore the column, so it will not be updated as part of the Profiling job.
Assigning Algorithms
To set criteria for sensitive columns or fields:
- Click the edit icon to the right of a column or field name.
- From the Domain drop-down list, select the appropriate sensitive data element type.
- The Delphix Masking Engine defaults to a Masking Algorithm as specified in the Settings screen. If necessary, you can override the default algorithm.
- To select a different masking algorithm, choose one from the Algorithm drop-down list. For detailed descriptions of these algorithms, see Out Of The Box Algorithm Frameworks.
- Select an ID Method:
- Auto — The default value. The profiling job can determine or update whether to mask a column.
- User — The user decides whether to mask/unmask a column. The user's choice overrides the profiling job. (The user masking is done after the profiling job is finished.)
- You can add/remove notes in the Notes text field.
- When you are finished, click Save. You must click Save for any edits to take effect.
Note
If you select a DATESHIFT algorithm and you are not masking a datetime or timestamp column, you must specify a Date Format. (This field only appears if you select a DATESHIFT algorithm from the Masking Algorithm dropdown.) For a list of acceptable formats, click the Help link for Date Format. The default format is yyyy-MM-dd.
Managing a File Inventory
Defining Fields
Note
You must select a delimited or fixed-width file connector from the Select Rule Set drop-down list on the left navigation pane, not a database.
To create new fields:
-
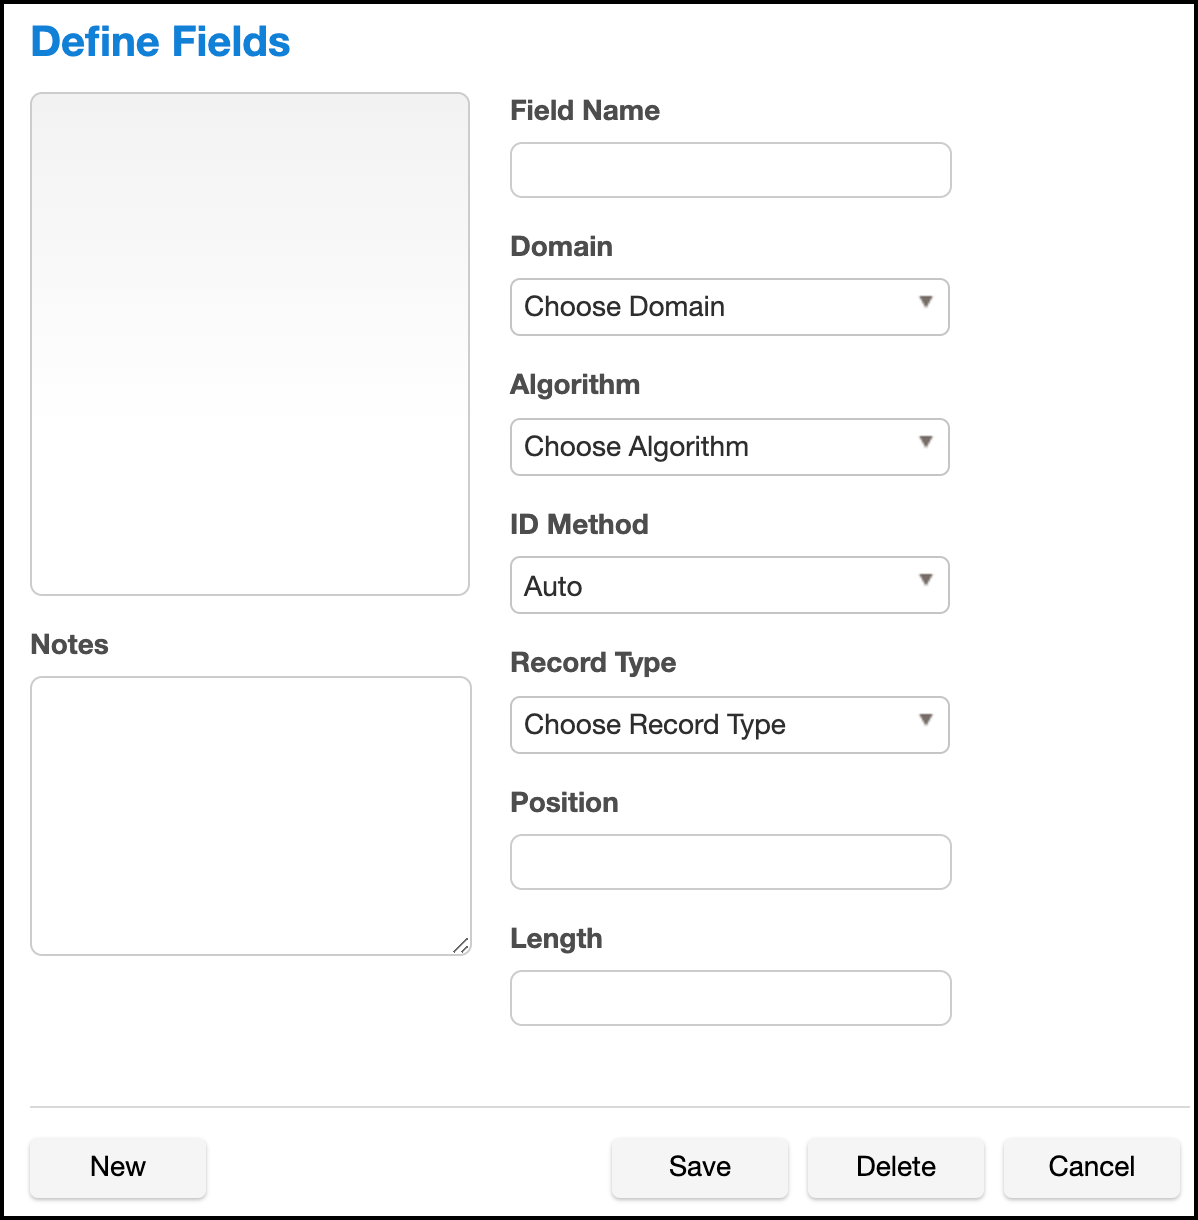
From an Environment's Inventory tab, click Define fields to the far right. The Edit Fields window appears.
-
Edit the fields as described in Setting Field Criteria for a File.
- When you are finished, click New to create a new field, or click Save to update an existing field.
Record Types
You can use record types to perform conditional masking of the file records. If a file has different set of records spread across multiple rows, then the masking engine should be able to understand all the unique records. For example, a file has the following record in the first 3 columns of each row: first name, last name, and age. But the last column of each row has a unique record like IP address, ethernet address, etc. Then you must create a new record type for every unique record present in the file and assign a specific file format to all the record types. For more information on adding a record type, see Managing Record Types.
Managing a Mainframe Inventory
Redefine Conditions
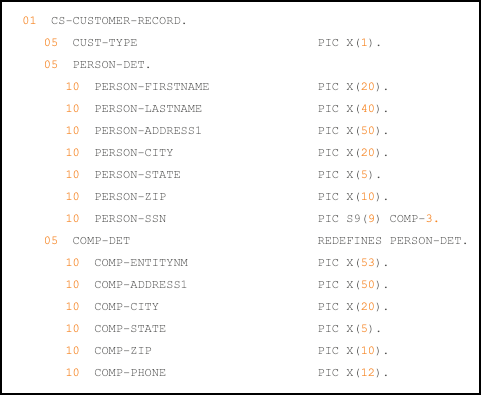
For Mainframe data sets, the inventory also allows for the entry of Redefine Conditions, which are used to handle any occurrences of COBOL's REDEFINES construct that might appear in the Copybook. In COBOL, the REDEFINES keyword allows an area of a record to be interpreted in multiple different ways. In the example below, for instance, each record can hold either the details of a person (PERSON-DET) or the details of a company (COMP-DET).
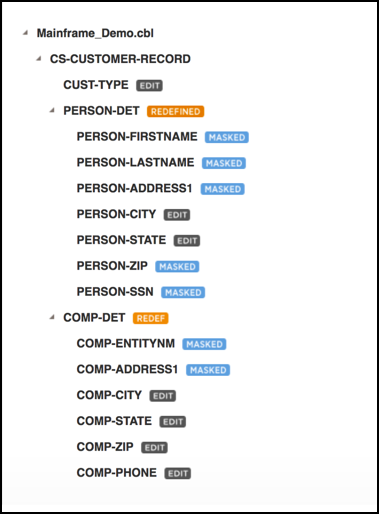
Depending on which group is present, different masking algorithms may need to be applied. Below is the inventory corresponding to this copybook, which allows algorithms to be selected separately for each group.
In order to do any masking however, the Masking Engine must be able to determine, for each record, which fields should be read, so that the correct algorithms can be applied. In order to do this, the masking engine uses Redefine Conditions, which are specified in the inventory. Redefine Conditions are boolean expressions which can reference any fields in the record when they are evaluated.
In the example copybook above, the field CUST-TYPE is used to indicate which group is present. If CUST-TYPE holds a 'P', a PERSON-DET group is present, and if it holds a 'C', COMP-DET is present. This can be expressed in the inventory by specifying a Redefine Condition with the value [CUST-TYPE]='P' . This expression indicates that, for each record read from the source file during the masking job, the value of the field CUST-TYPE should be read and compared against the string 'P'. If it is equal, the Masking Engine will read from the record the fields subordinate to PERSON-DET, and will apply any masking algorithms specified on those fields. Similarly, a Redefine Condition with the value [CUST-TYPE]='C' should be applied to the COMP-DET field. Exactly one of the conditions should evaluate to 'true' for each group of redefined fields. For example, a copybook might have fields A, B REDEFINES A, and C REDEFINES A. Of the Redefine Conditions attached to A, B, and C, one and only one should evaluate to true for each record.
Entering a Redefine Condition
- Click on the orange REDEFINED or REDEF button next to the redefined or redefining field
-
Enter a condition in the dialog box which appears. This is the expression, which, when it evaluates to true, causes the subordinate fields to be read and, if they have algorithms assigned, masked.

-
Click Submit.
Format of Redefine Conditions
Redefine Conditions allow fields to be compared against either number or string literals. Square brackets enclosing a field name indicate a variable, which takes on the value of the named field:
[Field1] = 'An example String'
String literals can be enclosed in either single or double quotes. For fields that are numeric (e.g. PIC S99V9), the operators <, <=, >, and >= can be used in addition to the =operator, e.g.
[Field2] <= -10.5
Also, conditions can be joined using AND, OR, and NOT to form more complex conditions:
([Field3] > 2.5 AND [Field3] < 10) OR NOT [FIELD4] = 'Z'
Importing and Exporting an Inventory
To export an inventory:
- Click the Export icon at the upper right. The Export Inventory pop-up appears with the name of the currently selected Rule Set as the Inventory Name and a corresponding .csv File Name.
- Click Save.
A status pop-up appears. When the export operation is complete, you can click on the Download file name to access the inventory file
To import an inventory:
- In the upper right-hand corner, click the Import icon. The Import Inventory pop-up appears.
- Click Select to browse for the name of a comma-separated (.csv) file.
- Click Save.
The inventory you imported appears in the Rule Set list for this environment.
Info
You can import only one ruleset at a time.
Info
The format of an imported.csv file must exactly match the format of the exported inventory. If you plan to import an inventory, before importing the inventory, you should export it and then update the exported file as needed before you import it.
Document Store Type Masking
This feature provides the ability to mask JSON and XML data stored in database columns, providing a solution for CLOB and varchar/nvcarchar columns that contain XML data. This is done by marking the columns as Document Store Type.
Multi-column algorithms are not supported. Currently, the Continuous Compliance Engine uses character streaming parsers that are only available for XML & JSON file formats. This feature can only be used with the following database column data types:
char, varchar, varchar2, clob, text, tinytext, mediumtext, longtext, bpchar, nchar, nvarchar, ntext, unichar, univarchar, unitext, nclob, nvarchar2,
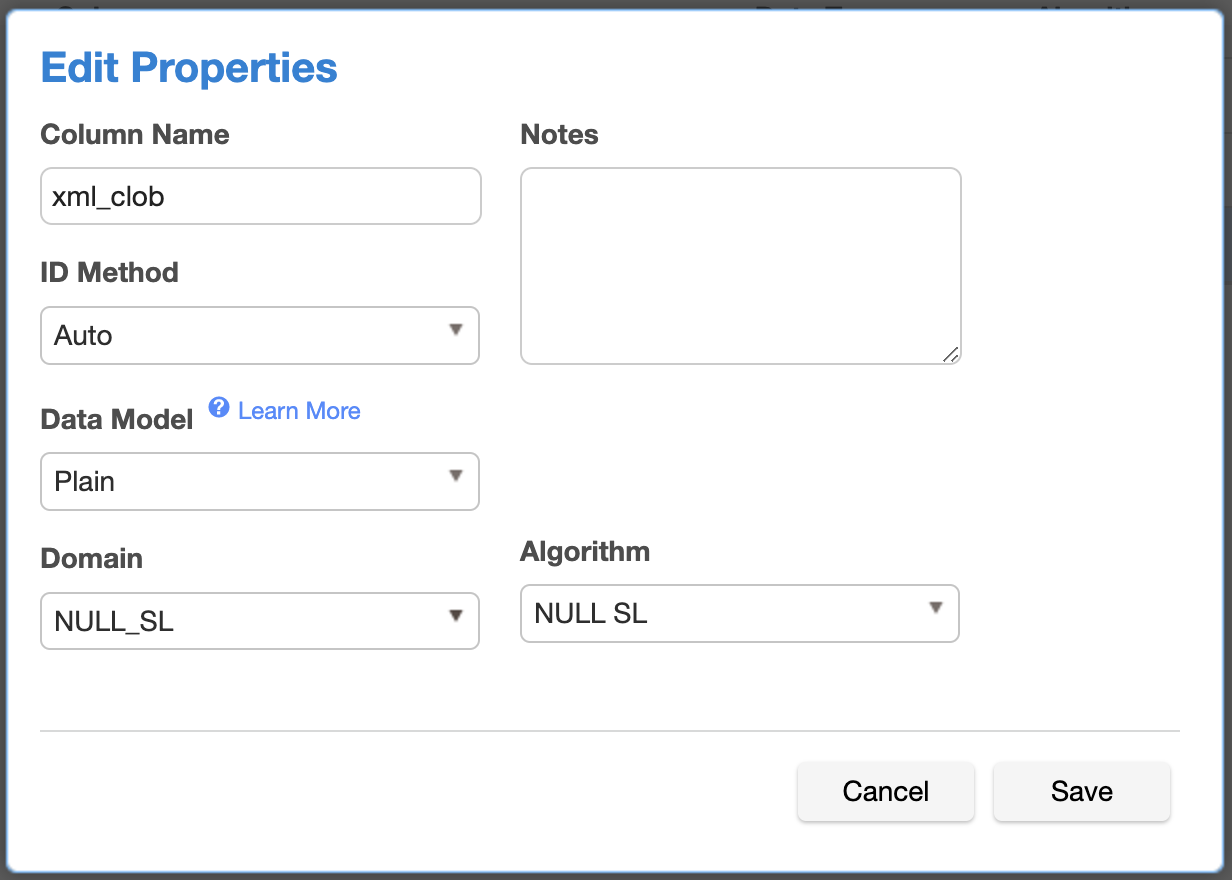
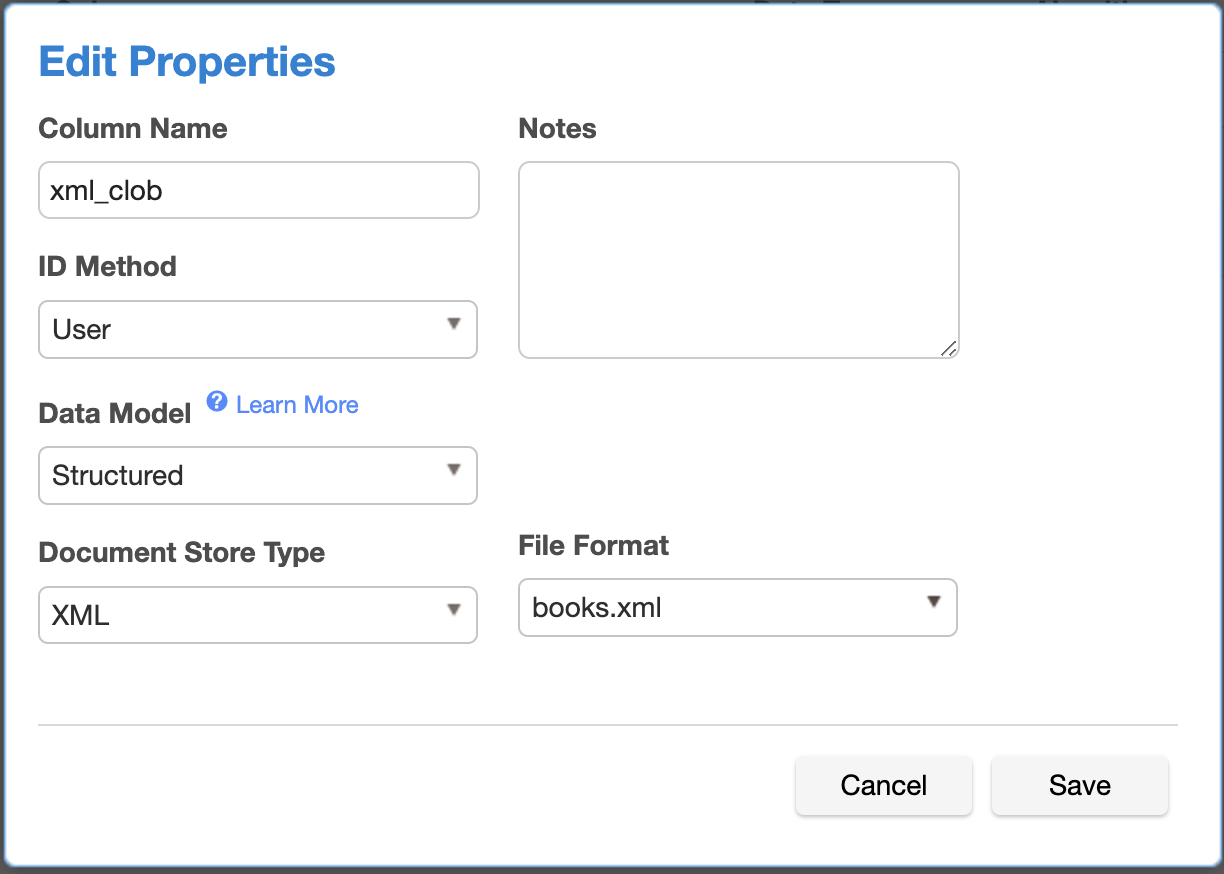
Columns with these types can be marked with a new parameter called Data Model, which has Plain or Structured values. For database columns with content type marked as Structured, an associated File Type and corresponding File Format can be associated with it.
The image below shows the fields for assigning XML/JSON file formats or algorithms to a database column, with Data Model as Plain.
The image below shows the fields for assigning XML/JSON file formats or algorithms to a database column, with Data Model as Structured.
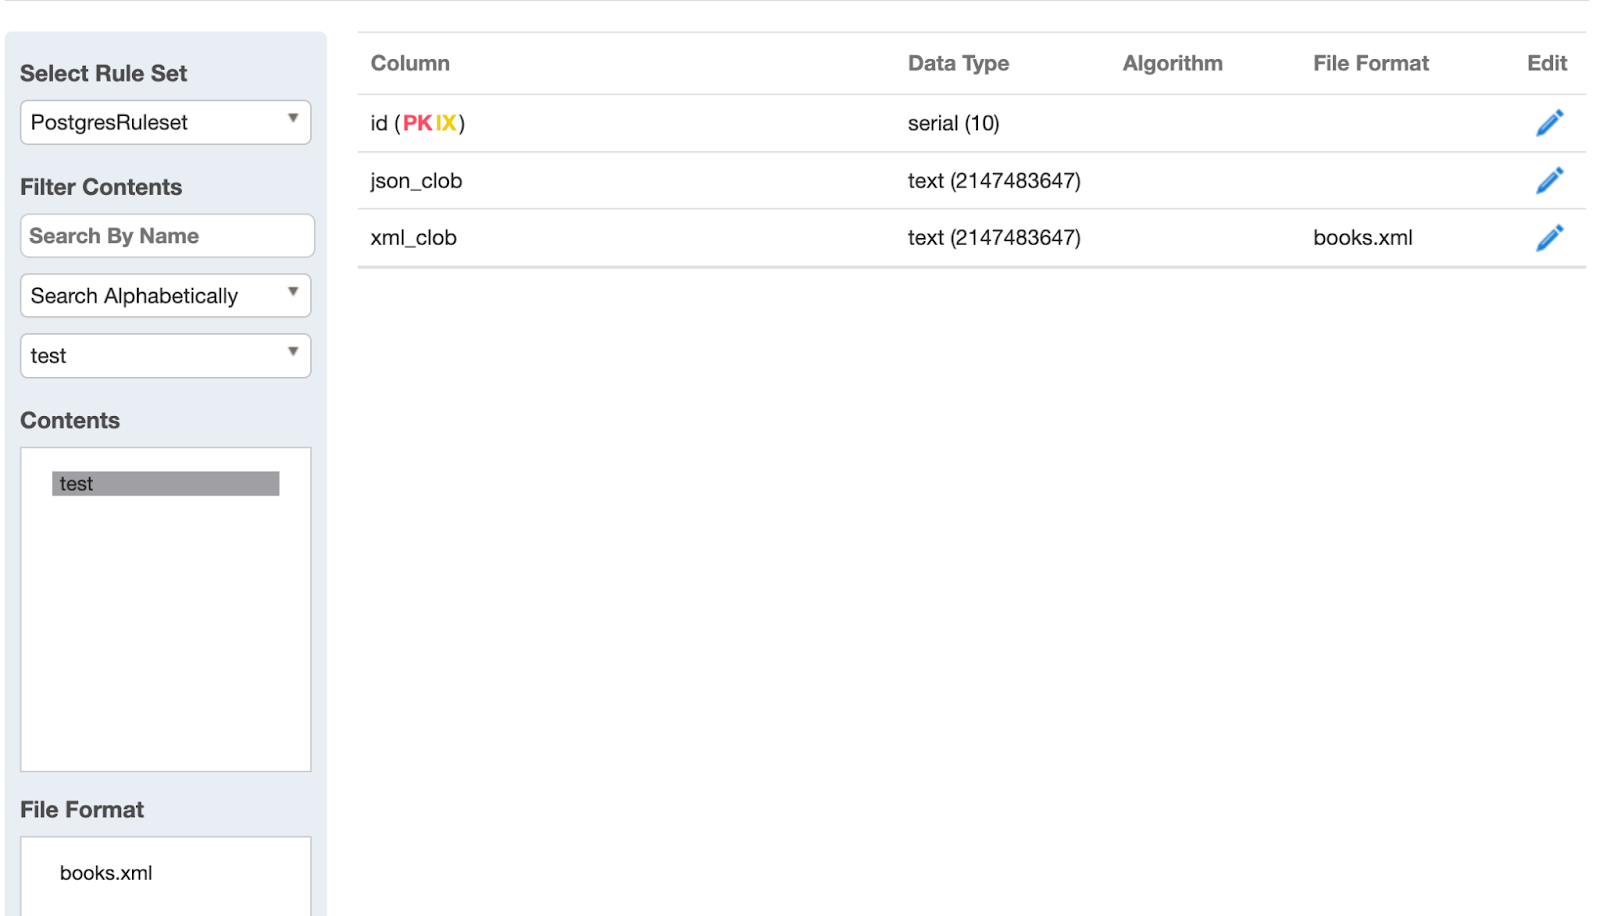
The image below shows the Ruleset Inventory page, to access an assigned File Format and assign domains to each field. This can be done by clicking on the required File Format listed in the corresponding multi-select box in the left panel of the page.