Installation/First Time Setup
This section walks you step by step on how to download and install the Delphix Engine software onto your infrastructure (VMware, AWS EC2, or Azure).
Installing OVA on VMware
For detailed recommendations on hardware prerequisites for VMware, please see Getting Started - Prerequisites. Here are the steps to getting your OVA installed:
-
Download the OVA file from Delphix’s Download site. Note, you will need a support login from your sales team or welcome letter. Navigate to “Virtual Appliance” and download the appropriate OVA. If unsure, use the HWv8_Standard type.
-
Login using the vSphere client to the vSphere server (or vCenter Server) where you want to install the Delphix Engine.
-
In the vSphere Client, click File.
-
Select Deploy OVA Template and then browse to the OVA file. Click Next.
-
Select a hostname for the Delphix Engine. This hostname will be used in configuring the Delphix Engine network.
-
Select the data center where the Delphix Engine will be located.
-
Select the cluster and the ESX host.
-
Select one (1) data store for the Delphix OS. This datastore can be thin-provisioned and must have enough free space to accommodate the 300GB comprising the Delphix operating system.
-
The Delphix VM Configuration Storage requires a minimum of 10GB. The VMFS volume should have enough available space to hold all ESX configuration and log files associated with the Delphix Engine.
The Delphix Engine system disk should be stored in a VMDK system drive. The VMFS volume where the .ova is deployed should therefore have at least 300GB of free space prior to deploying the .ova. The VMFS volume must be located on shared storage in order to use vMotion and HA features.
-
Select the virtual network you want to use. If using multiple physical NICs for link aggregation, you must use vSphere NIC teaming. Do not add multiple virtual NICs to the Delphix Engine itself. The Delphix Engine should use a single virtual network. For more information, see Optimal Network Architecture for the Delphix Engine.
-
Click Finish. The installation will begin and the Delphix Engine will be created in the location you specified.
-
Jump to “Setting up the Delphix Engine” section below to learn how to activate the masking service now that you have the software installed.
Installing AMI on AWS EC2
For detailed recommendations on hardware prerequisites for AWS EC2, please see Getting Started - Prerequisites. Here are the steps to getting your AMI installed:
-
On the Delphix download site, click the AMI you would like to share and accept the Delphix License agreement. Alternatively, follow a link given by your Delphix solutions architect.
-
On the Amazon Web Services Account Details form presented:
-
Enter your AWS Account Identifier, which can be found here: https://console.aws.amazon.com/billing/home?#/account. If you want to use the GovCloud AWS Region, be sure to enter the ID for the AWS Account which has GovCloud enabled.
-
Select which AWS Region you would like the AMI to be shared in. If you would like the AMI shared in a different region, contact your Delphix account representative to make the proper arrangements.
-
-
Click Share. The Delphix Engine will appear in your list of AMIs in AWS momentarily.
-
Reference the Installation and Configuration Requirements for AWS/EC2 when deploying the AMI.
-
Jump to “Setting up the Delphix Engine” section below to learn how to activate the masking service now that you have the software installed.
Installing VHD on AZURE
For detailed recommendations on hardware prerequisites for Azure, please see Getting Started - Prerequisites. Here are the steps to getting your VHD installed:
-
On the Microsoft Azure Marketplace, search for Delphix. Click GET IT NOW.
-
Reference the Installation and Configuration Requirements for the Delphix Engine in Azure when deploying the VHD.
-
Jump to “Setting up the Delphix Engine” section below to learn how to activate the masking service now that you have the software installed.
Setting up the Delphix Engine
Once you setup the network access for your Delphix Engine, enter the Delphix Engine URL in your browser for server setup. The Unified Setup wizard Welcome screen below will appear for you to begin your Delphix Engine setup.
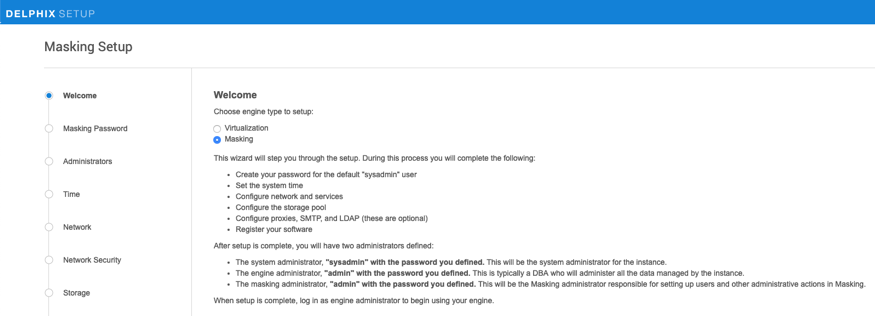
The Welcome page allows you to to setup Masking-specific settings such as Masking admin user’s email and password as well as Masking SMTP settings directly from the setup wizard. It will then redirect the customer to the corresponding login page based on the engine type selected.
When Masking is selected, the following will be added to the Welcome screen; "admin" with the password you defined. This will be the Masking administrator responsible for setting up users and other administrative actions in Masking.
There are limitations to this feature:
- Only Masking user settings (email and password) and SMTP settings are supported. Customers will need to use the API to setup LDAP.
- Once set, these settings can only be updated via the Masking API. There are no corresponding sections in the system dashboard.
- Engine Type cannot be modified once set in the Setup Wizard because it has other dependencies such as SSO.
Note
If the wrong password is entered, after 3 times the user will be locked out of the Masking service.
- On the Welcome tab select Masking and then click Next.
- In the Masking Password tab enter the current default (out-of-box) password for Masking. (Currently the default is Admin-12.)
- Click Validate or Next. This causes the engine to validate the entered password with the masking service.
- In the Administrators tab enter System Administrator, Masking Administrator, and Engine Administrator credentials. Then click Next.
- Select an option for maintaining system time. Then click Next.
- Configure your network interfaces and services and then select Next.
- Delphix installs certificates signed by the Engines Certificate Authority. You can replace any certificate. Once you are ready click Next.
- The Delphix Engine automatically discovers and displays storage devices. For each device, set the Usage Assignment to Data and set the Storage Profile to Striped. Then click Next.
- Enter the Masking SMTP settings and then click Next.
- The Authentication tab allows users to configure Virtualization LDAP settings. But Masking LDAP settings must be configured via the Masking API.
- To enable SAML/SSO, set the Audience Restriction (SP entity ID, Partner’s Entity ID) in the identity provider to be the Engine UUID. Select Use SAML/SSO.IdP metadata is an XML document which must be exported from the application created in your IdPCopy and pasted in the IdP Metadata field. Click Next.
- If using Kerberos authentication select Use Kerberos authentication and complete all fields. Then enter Next.
- If the Delphix Engine has access to the external Internet (either directly or through a web proxy), then you can auto-register the Delphix Engine. If external connectivity is not immediately available, you must perform manual registration. Copy the Delphix Engine registration code.
- Click Next.
- The final Summary tab will enable you to review your configuration. Click Submit to acknowledge the configuration.
Logging in to the Delphix Masking Engine
- Login to a web browser that points to http://masking-engine.example.com/masking.
- Enter default username: admin.
- Enter default user password: Admin-12