Managing Rule Sets
This section describes how Rule Sets can be created, edited, and removed.
The Rule Sets Screen
From anywhere within an Environment, click the Rule Set tab to display the Rule Sets associated with that environment. The Rule Sets screen appears. If you have not yet created any rule sets, the Rule Set list is empty.

The Rule Sets screen contains the following information and actions:
-
Rule Set ID — The numeric ID of the rule set used to refer to the rule set from the Masking API.
-
Name — The name of the rule set.
-
Meta Data Source — The type of rule set. One of Database, File, or Mainframe.
-
Type — The specific type of ruleset.
-
Edit — Edit the rule set. See more details below.
-
Refresh/Save — Refresh the rule set. Only applies to Database rule sets. See more details below.
-
Copy — Copy the rule set. See more details below.
-
Delete — Delete the rule set. See more details below.
The rule sets on the screen can be sorted by the various informational fields by clicking on the respective field.
The Create/Edit Rule Set Window
In the upper right-hand corner, click the Create Rule Set button.
The Create Rule Set window appears.

1 |
Rule Set Name Input Field When editing an existing rule set, this field will be filled with the existing rule set name by default. |
2 |
Connector List When creating a new rule set, all available connectors will be listed here. When editing an existing rule set, only the connector currently in use will appear. |
3 |
Table or File List If a database connector is selected in the connector list, all available tables in the database schema associated with the connector will appear in this list. If a file connector is selected, all available files in the directory associated with the connector will appear in this list. |
4 |
Selected Table or File Number Displays how many tables or files you have selected. |
5 |
Search Query Input Field You can enter a search query here. After typing the search query, press ENTER to execute the search query. NOTE - search query
|
6 |
Clear Search Button Click to remove any search query. |
7 |
Select All Button Click to select all tables or files in the table or file list. |
8 |
Clear All Button Click to deselect all tables or files in the table or file list. |
9 |
File Name Patterns Editor This editor will appear only when the selected connector is a file connector. |
10 |
Add File Pattern Button Click to add a new file pattern entry below. |
11 |
File Pattern Input Field Enter the file pattern here. NOTE - file pattern syntax
|
12 |
Remove File Pattern Button Click to remove a file pattern. |
Creating a Rule Set
To create a new rule set:
-
Click on the name of an Environment, and then click the Rule Set tab.
-
In the upper right-hand corner of the Rule Set screen, click Create Rule Set.
-
The Create Rule Set screen lets you specify which tables belong in the rule set.
-
Enter a name for the new Rule Set.
-
Select a Connector name from the drop-down menu.
-
The list of tables for that connector appears. If you have not yet created any connectors, the list is empty. Click individual table names to select them, or click Select All to select all the tables in the connector. See "Create/Edit Rule Set Window" for a description of the screen and other options.
-
Click Save.
You may then need to define the Rule Set by modifying the table settings as described in "Modifying Tables in a Rule Set" below.
For example:
-
For a table in a database rule set, you may want to filter data from the table.
-
For a file in a file or mainframe rule set, you must select a File Format to use.
Refreshing a Rule Set
Refreshing a rule set will result in the columns in the tables in the rule set being rescanned. As a result, the inventory associated with the rule set will also be refreshed, but any pre-existing algorithm assignments will be retained.
To refresh a rule set:
-
Click the Refresh/Save icon to the right of the rule set on the Rule Set screen.
-
The Refresh/Save icon will turn to an hourglass as the associated tables are rescanned.
-
After the refresh is complete, the Refresh/Save icon will return to the circular arrow.
Copying a Rule Set
If you copy a Rule Set, the inventory associated with that Rule Set will also be copied. Also, any filter conditions defined for that Rule Set will be copied.
To copy a rule set:
-
Click the Copy icon to the right of the rule set on the Rule Set screen.
-
The Copy Rule Set window appears.
-
Enter a Name for the new rule set.
-
Click Save.
-
Modify the rule set as you want, using the procedures described above.
Deleting a Rule Set
If you delete a Rule Set, the inventory associated with that Rule Set will also be deleted. Also, any filter conditions defined for that Rule Set will be deleted.
To delete a rule set, click the Delete icon to the right of the rule set on the Rule Set screen.
The Rule Set Screen
From the Rule Set tab, click on a rule set to display the tables or files in the rule set. The Rule Set screen appears.
The Rule Set screen contains the following information and actions:
-
Table or File or Pattern — The name of the table or file/file pattern in the rule set.
-
Edit — Edit the table or file in the rule set. See more details below.
-
Delete — Delete the table or file from the rule set.
For rule sets with a large number of tables or files, the Rule Set screen will be displayed on pages that can be navigated by the controls at the bottom of the list on the page. The tables or files displayed may also be filtered using the Search field and button.
Editing/Modifying a Rule Set
To edit a rule set:
-
Click the Edit icon to the right of the rule set on the Rule Set screen.
-
Click the Edit Rule Set button towards the top.
-
The Create Rule Set screen appears. This screen lets you specify which tables belong in the rule set.
-
Modify the rule set as you want, using the preceding procedures.
Removing a Table or File
To remove a table or file from a rule set:
-
From the Rule Set screen, click the name of the desired rule set.
-
Click the red delete icon to the right of the table or file you want to remove.
INFO
If you remove a table/file from a rule set and that table/file has an inventory, that inventory will also be removed.
Modifying Tables in a Rule Set
The features in this section are disabled for file and mainframe rule sets.
You can modify tables in a rule set as follows:
Logical Key
A logical key is a unique, non-null value that identifies a row in the database.
If your table has no primary keys defined in the database, and you are using an In-Place strategy, you must specify an existing column or columns to be a logical key. This logical key does not change the target database; it only provides information to Delphix. For multiple columns, separate each column using a comma. Note: If no primary key is defined and a logical key is not defined an identify column will be created.
To enter a logical key:
-
From the Rule Set screen, click the name of the desired rule set.
-
Click the green edit icon to the right of the table whose filter you wish to edit.
-
On the left, select Logical Key.
-
Edit the text for this property. The logical key cannot be more than 1024 characters in length.
-
To remove any existing code, click Delete.
-
Click Save.
Edit Filter
Use this function to specify a filter to run on the data before loading it to the target database.
To add a filter to a database rule set table or edit a filter:
-
From the Rule Set screen, click the name of the desired rule set.
-
Click the green edit icon to the right of the table you want.
-
On the left, select Edit Filter.
-
Edit the properties of this filter by entering or changing values in the Where field.
Be sure to specify column name with table name prefix (for example, customer.cust_id \<1000).
-
To remove an existing filter, click Delete.
-
Click Save.
Custom SQL
Use this function to supply a customized SQL SELECT Query for the table. Typically, this query will include a WHERE clause to filter or subset the data.
Warning
The custom SQL must contain the primary key column (or columns if the table uses a composite primary key) and all columns that will be masked.
To add or edit SQL code:
-
From the Rule Set screen, click the name of the desired rule set.
-
Click the green edit icon to the right of the table you want.
-
On the left, select Custom SQL.
-
Enter the custom SQL code for this table.
Delphix will run the query to subset the table based on the SQL you specify.
-
To remove any existing code, click Delete.
-
Click Save.
Creating a Ruleset For File Formats
Once you create a ruleset with a file or set of files, you will need to assign those files to their appropriate file format.
This is accomplished by editing the ruleset. Click on the edit button for the file the Edit File window will appear with the file name. From the format drop-down select the proper format for the file.
- If the file is a Mainframe data sets file with a copybook you will see a checkbox to signify if the file is variable length.
- For all other file types, select the end-of-record to let Delphix know whether the file is in windows/dos format (CR+LF) or Linux format (LF).
- If the file is a delimited file you will have a space to put in the delimiter.
- If there are multiple files in the ruleset you will have to edit each one individually and assign it to the appropriate file format.
Control Character Support for Delimited Files
The user can specify control character as a delimiter/end of record from UI/API.
NOTE - Control Character
The control character value from UI/API should be in $[hex value of the control character] format , like $[01] for ^A. The control character value support UTF-8 character set.

Control character as a delimiter
- In order to use control character as a delimiter, the user needs to click on CTRL button inside delimiter input text.
- Clicking on CTRL button will open a virtual keyboard where users can select the required control character. Also if the user wants to enter the control character manually then they can use the given format $[hex value of the control character] , like $[01] for ^A.
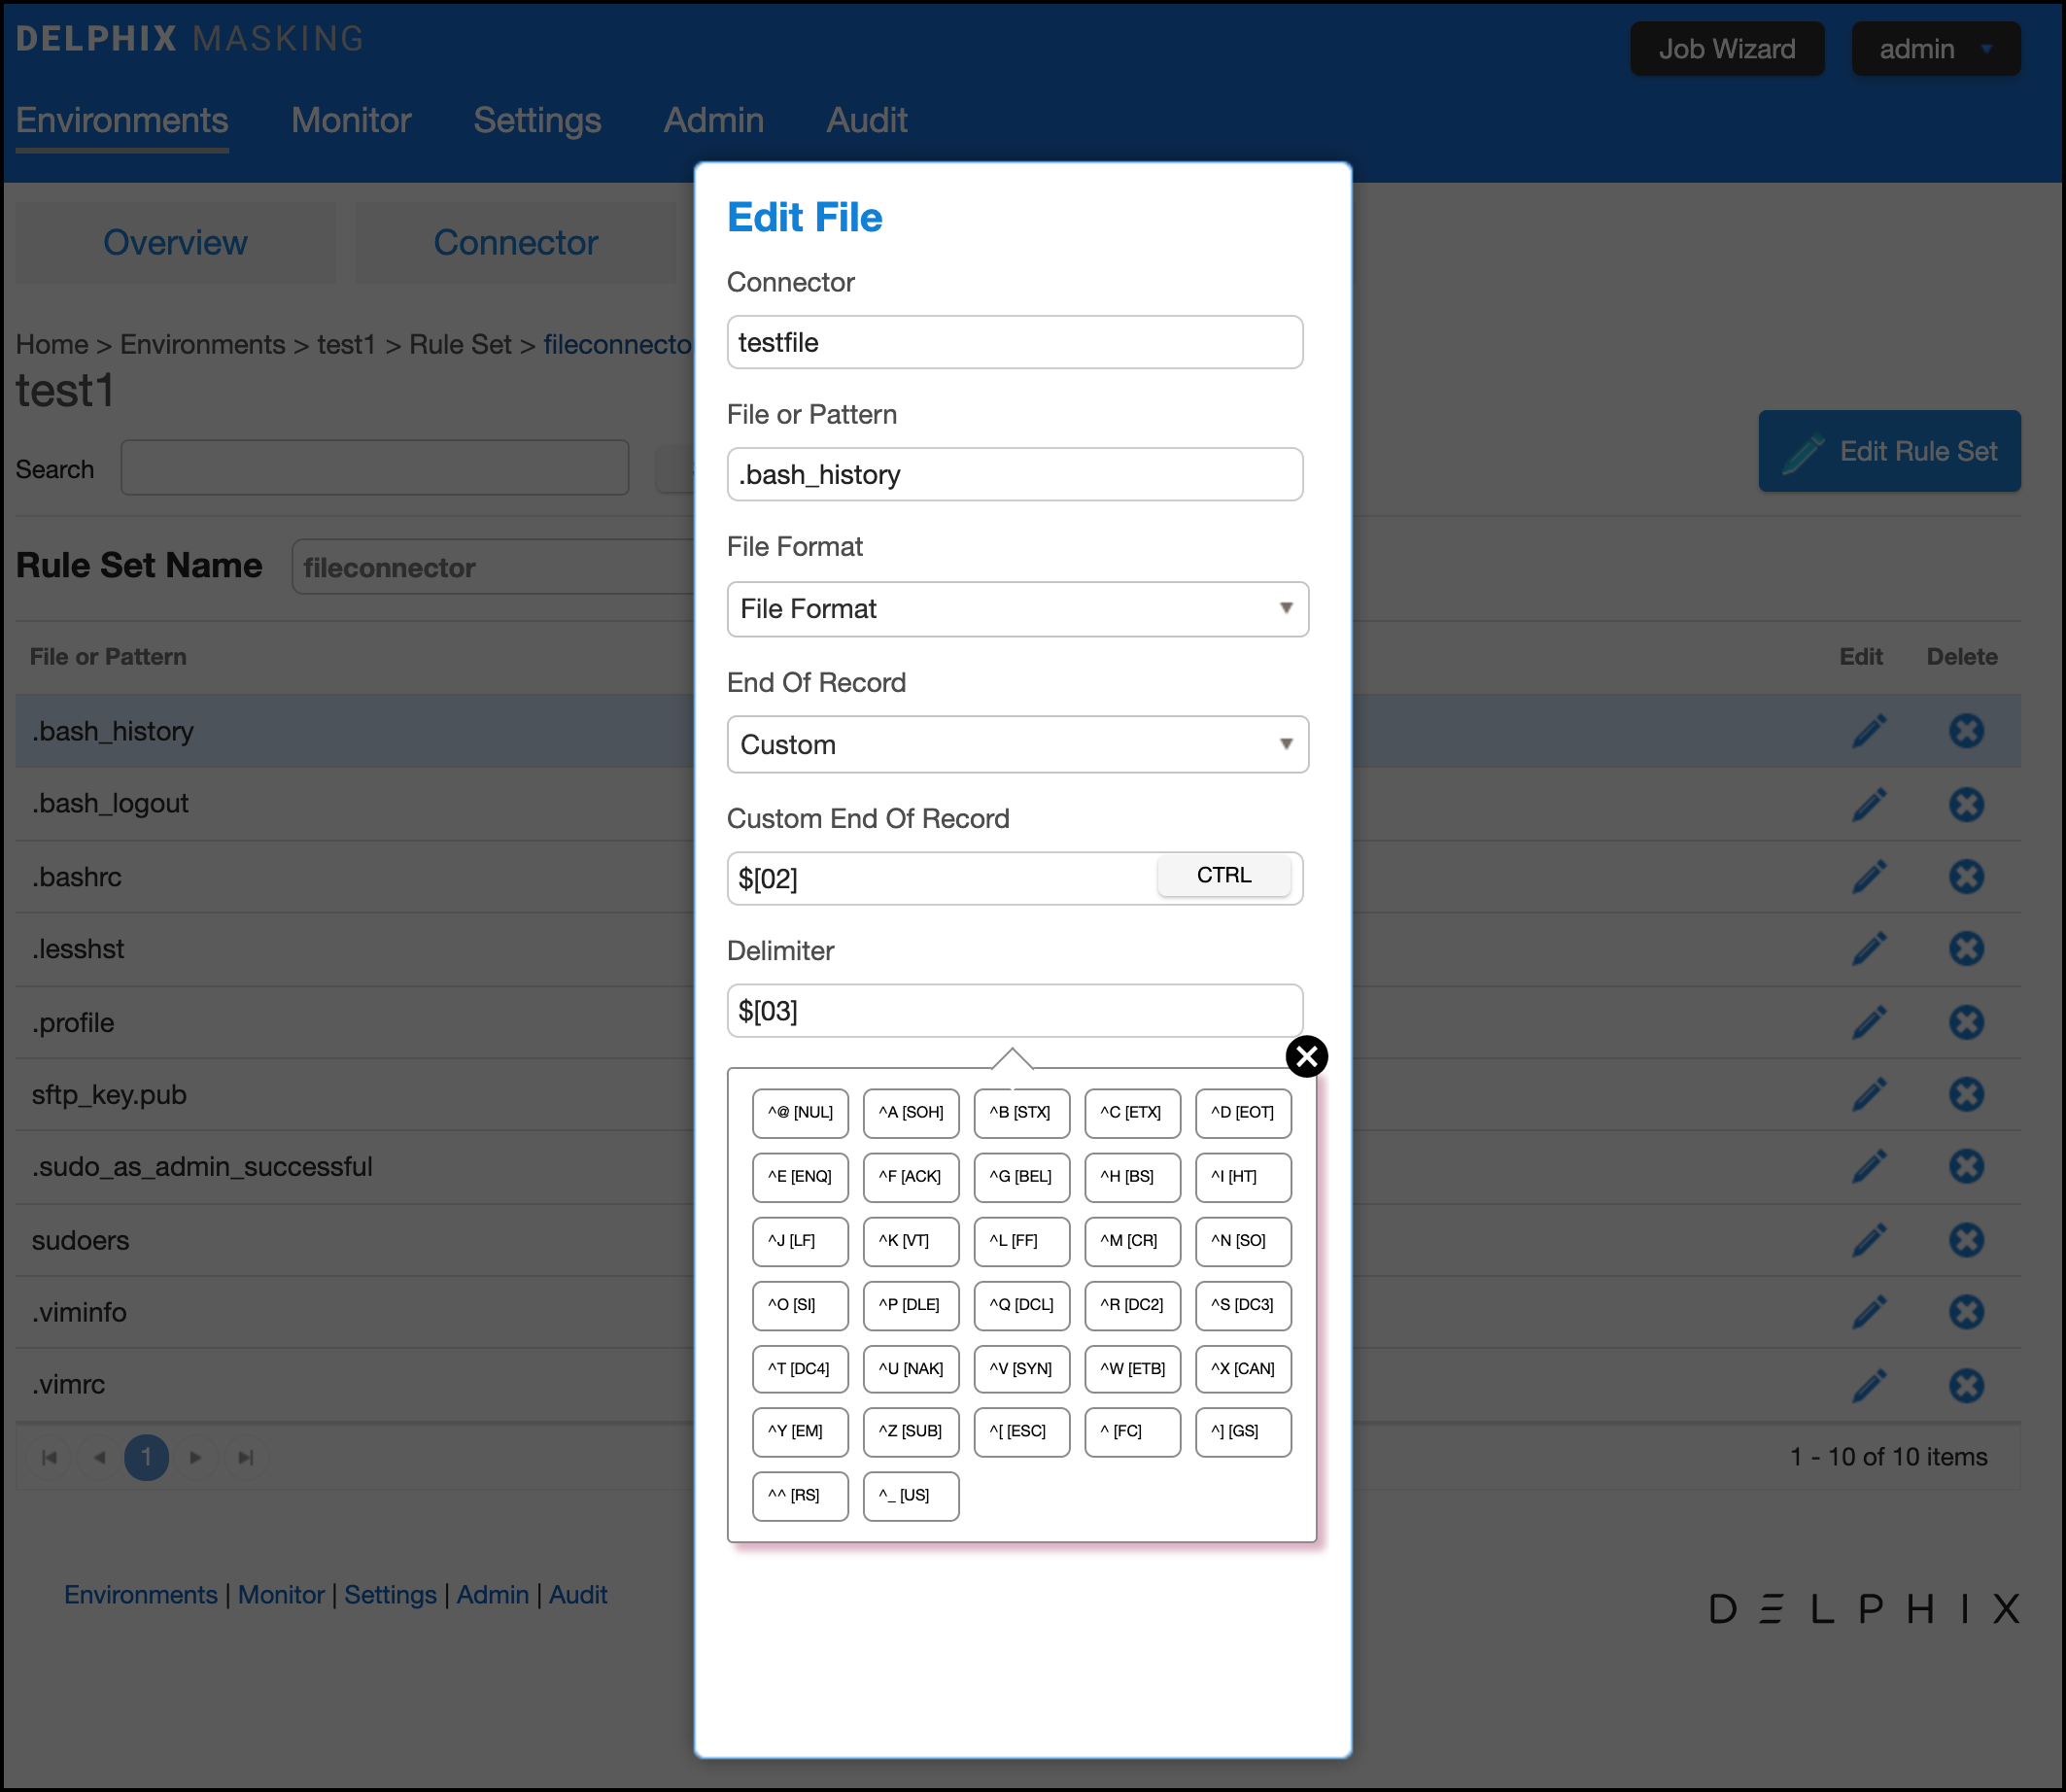
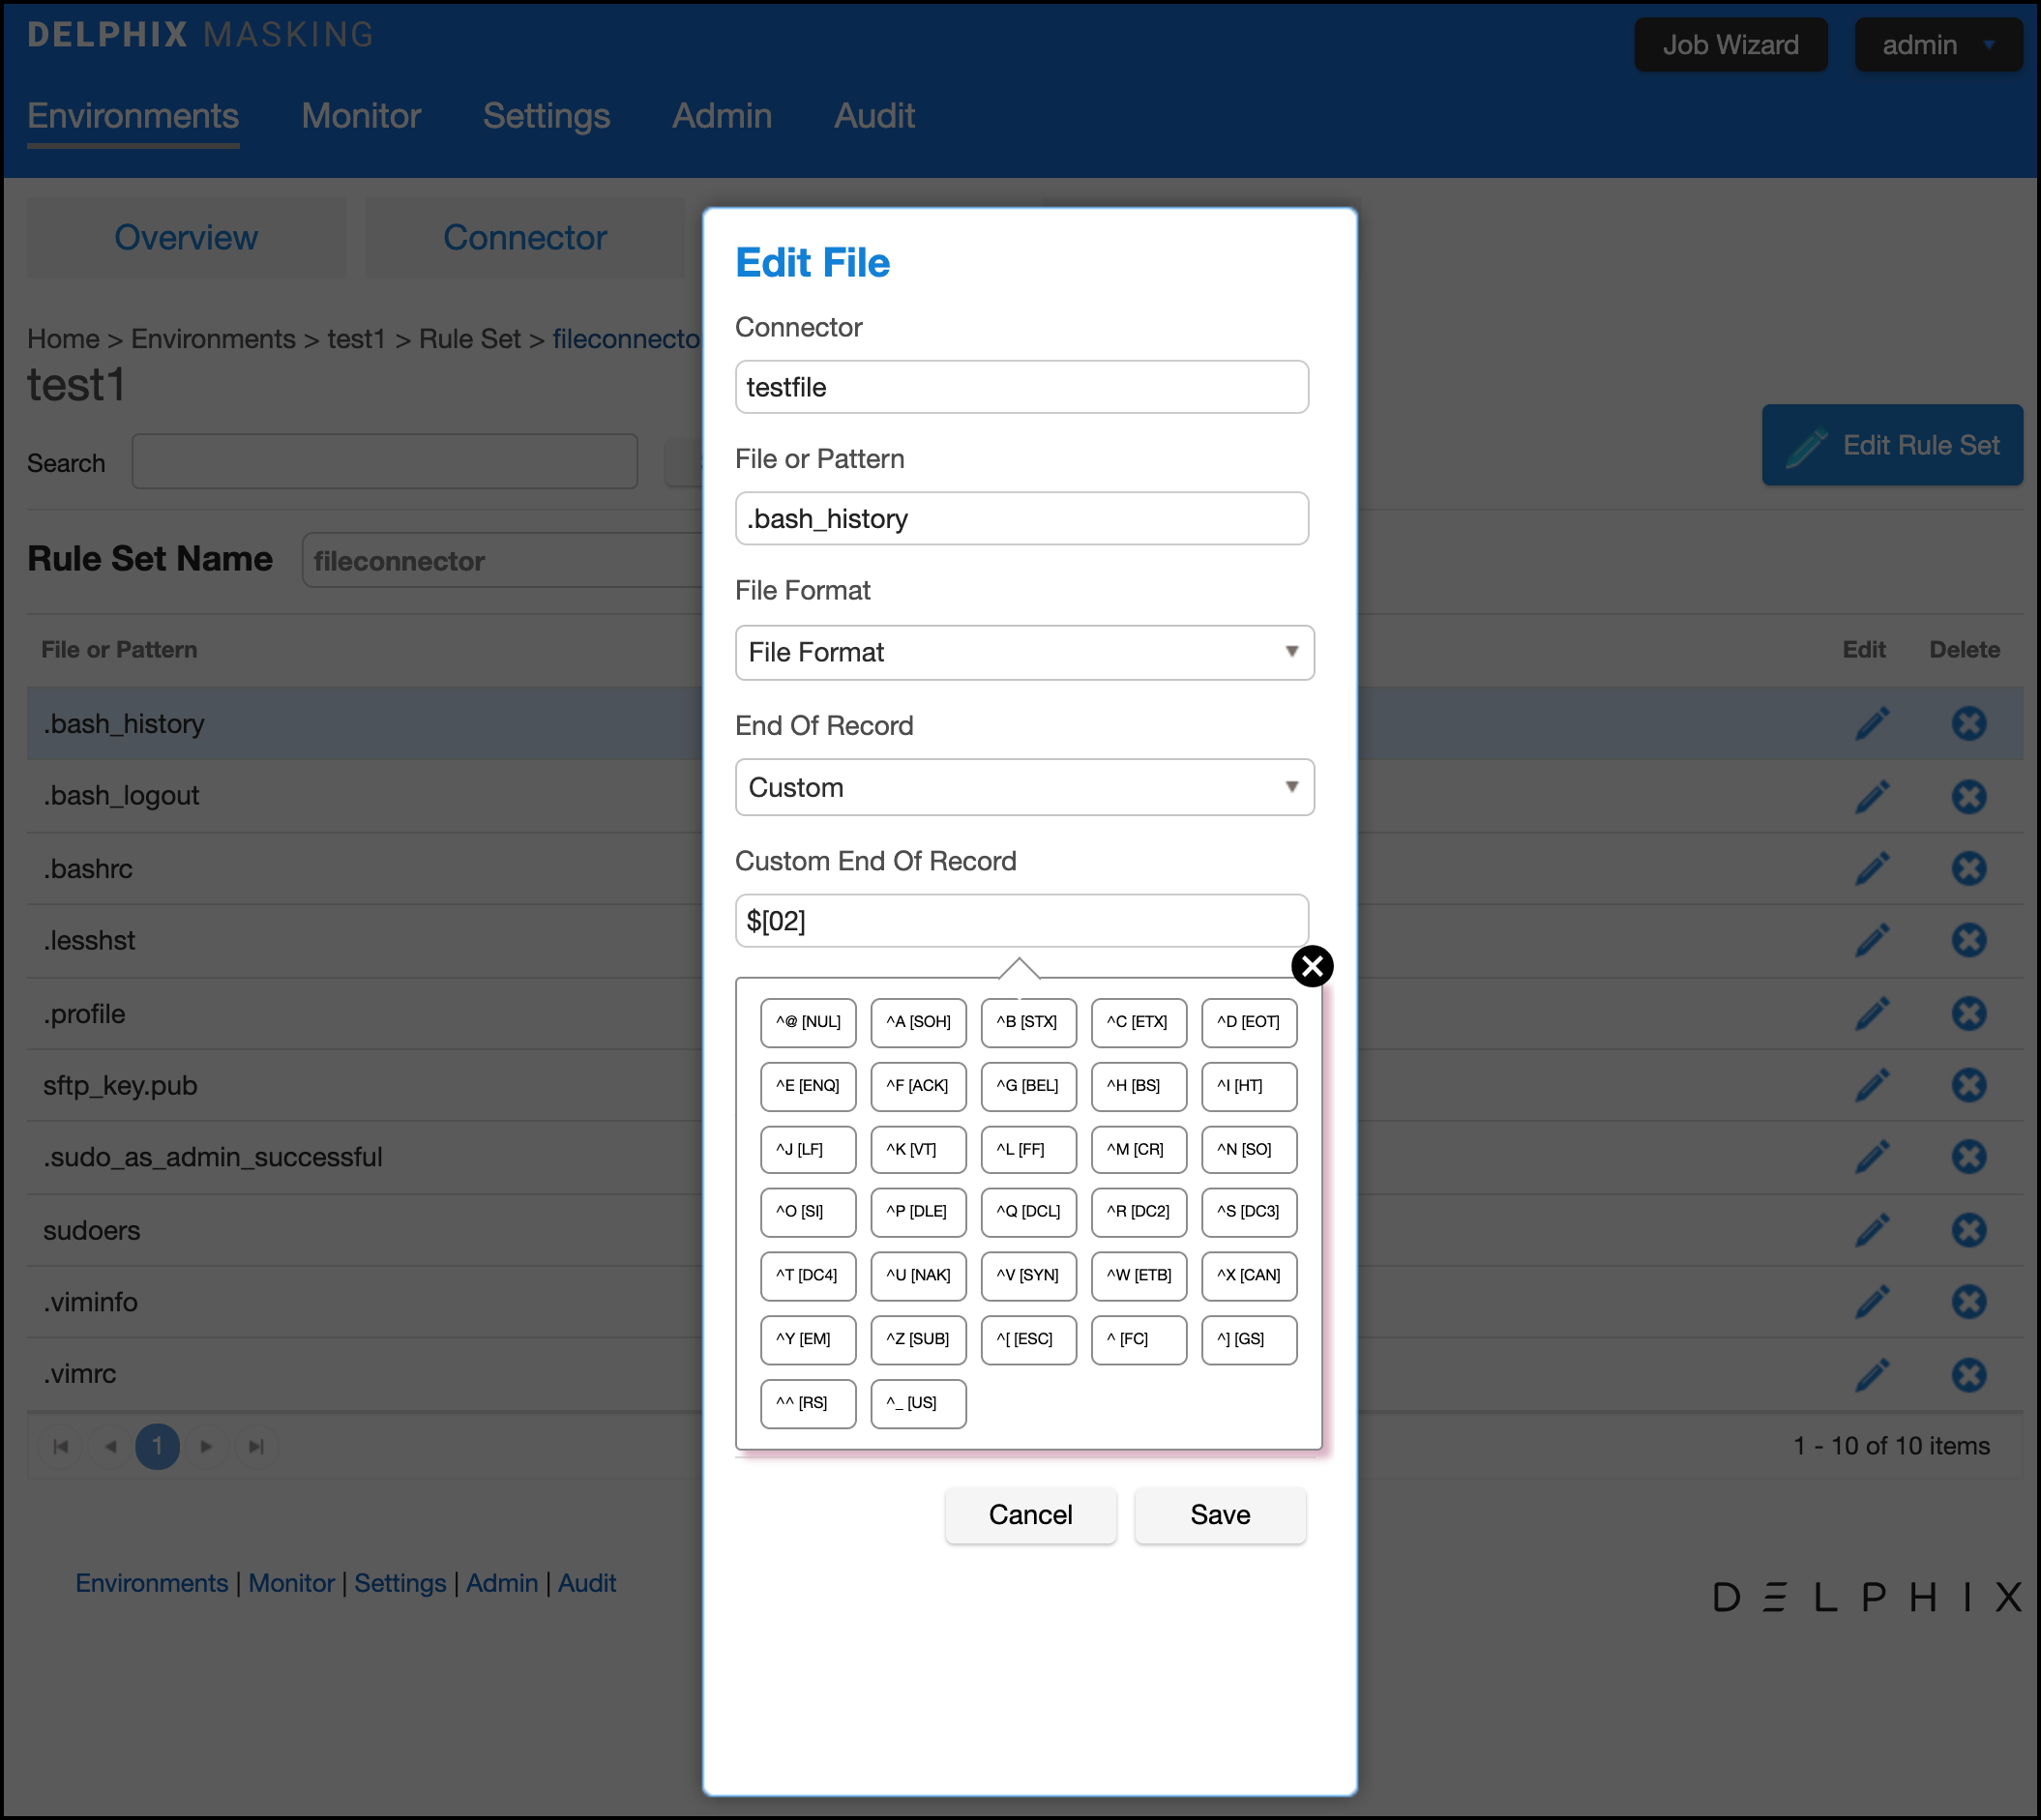
Control character as an end of record
- In order to use control character as an end of record, the user needs to click on CTRL button inside custom end of record input text.
- Clicking on CTRL button will open a virtual keyboard where users can select the required control character. Also if the user wants to enter the control character manually then they can use the given format $[hex value of the control character] , like $[01] for ^A.
Control character as a value
- Control characters are supported as values in a delimited file. No special configuration is necessary. Simply configure the deliited file format as usual.
- The user doesn’t need to configure anything extra if the control character is only part of the value and not being used as a delimiter or end of record. However, the user needs to define delimiter/end of record as per the requirement.
Define Enclosure Escaping Strategy for Delimited Files
The user can configure the enclosure escape character from the UI/API to escape the enclosure. To configure the enclosure escape character from the UI, user needs to select the "Enclosure Escaping Strategy" dropdown value as per below options on the edit ruleset popup window,
1. Double Enclosure
Double enclosure option will set the escape character value same as enclosure value. For example, if the enclosure escape character is " then escape character value will be " as well.
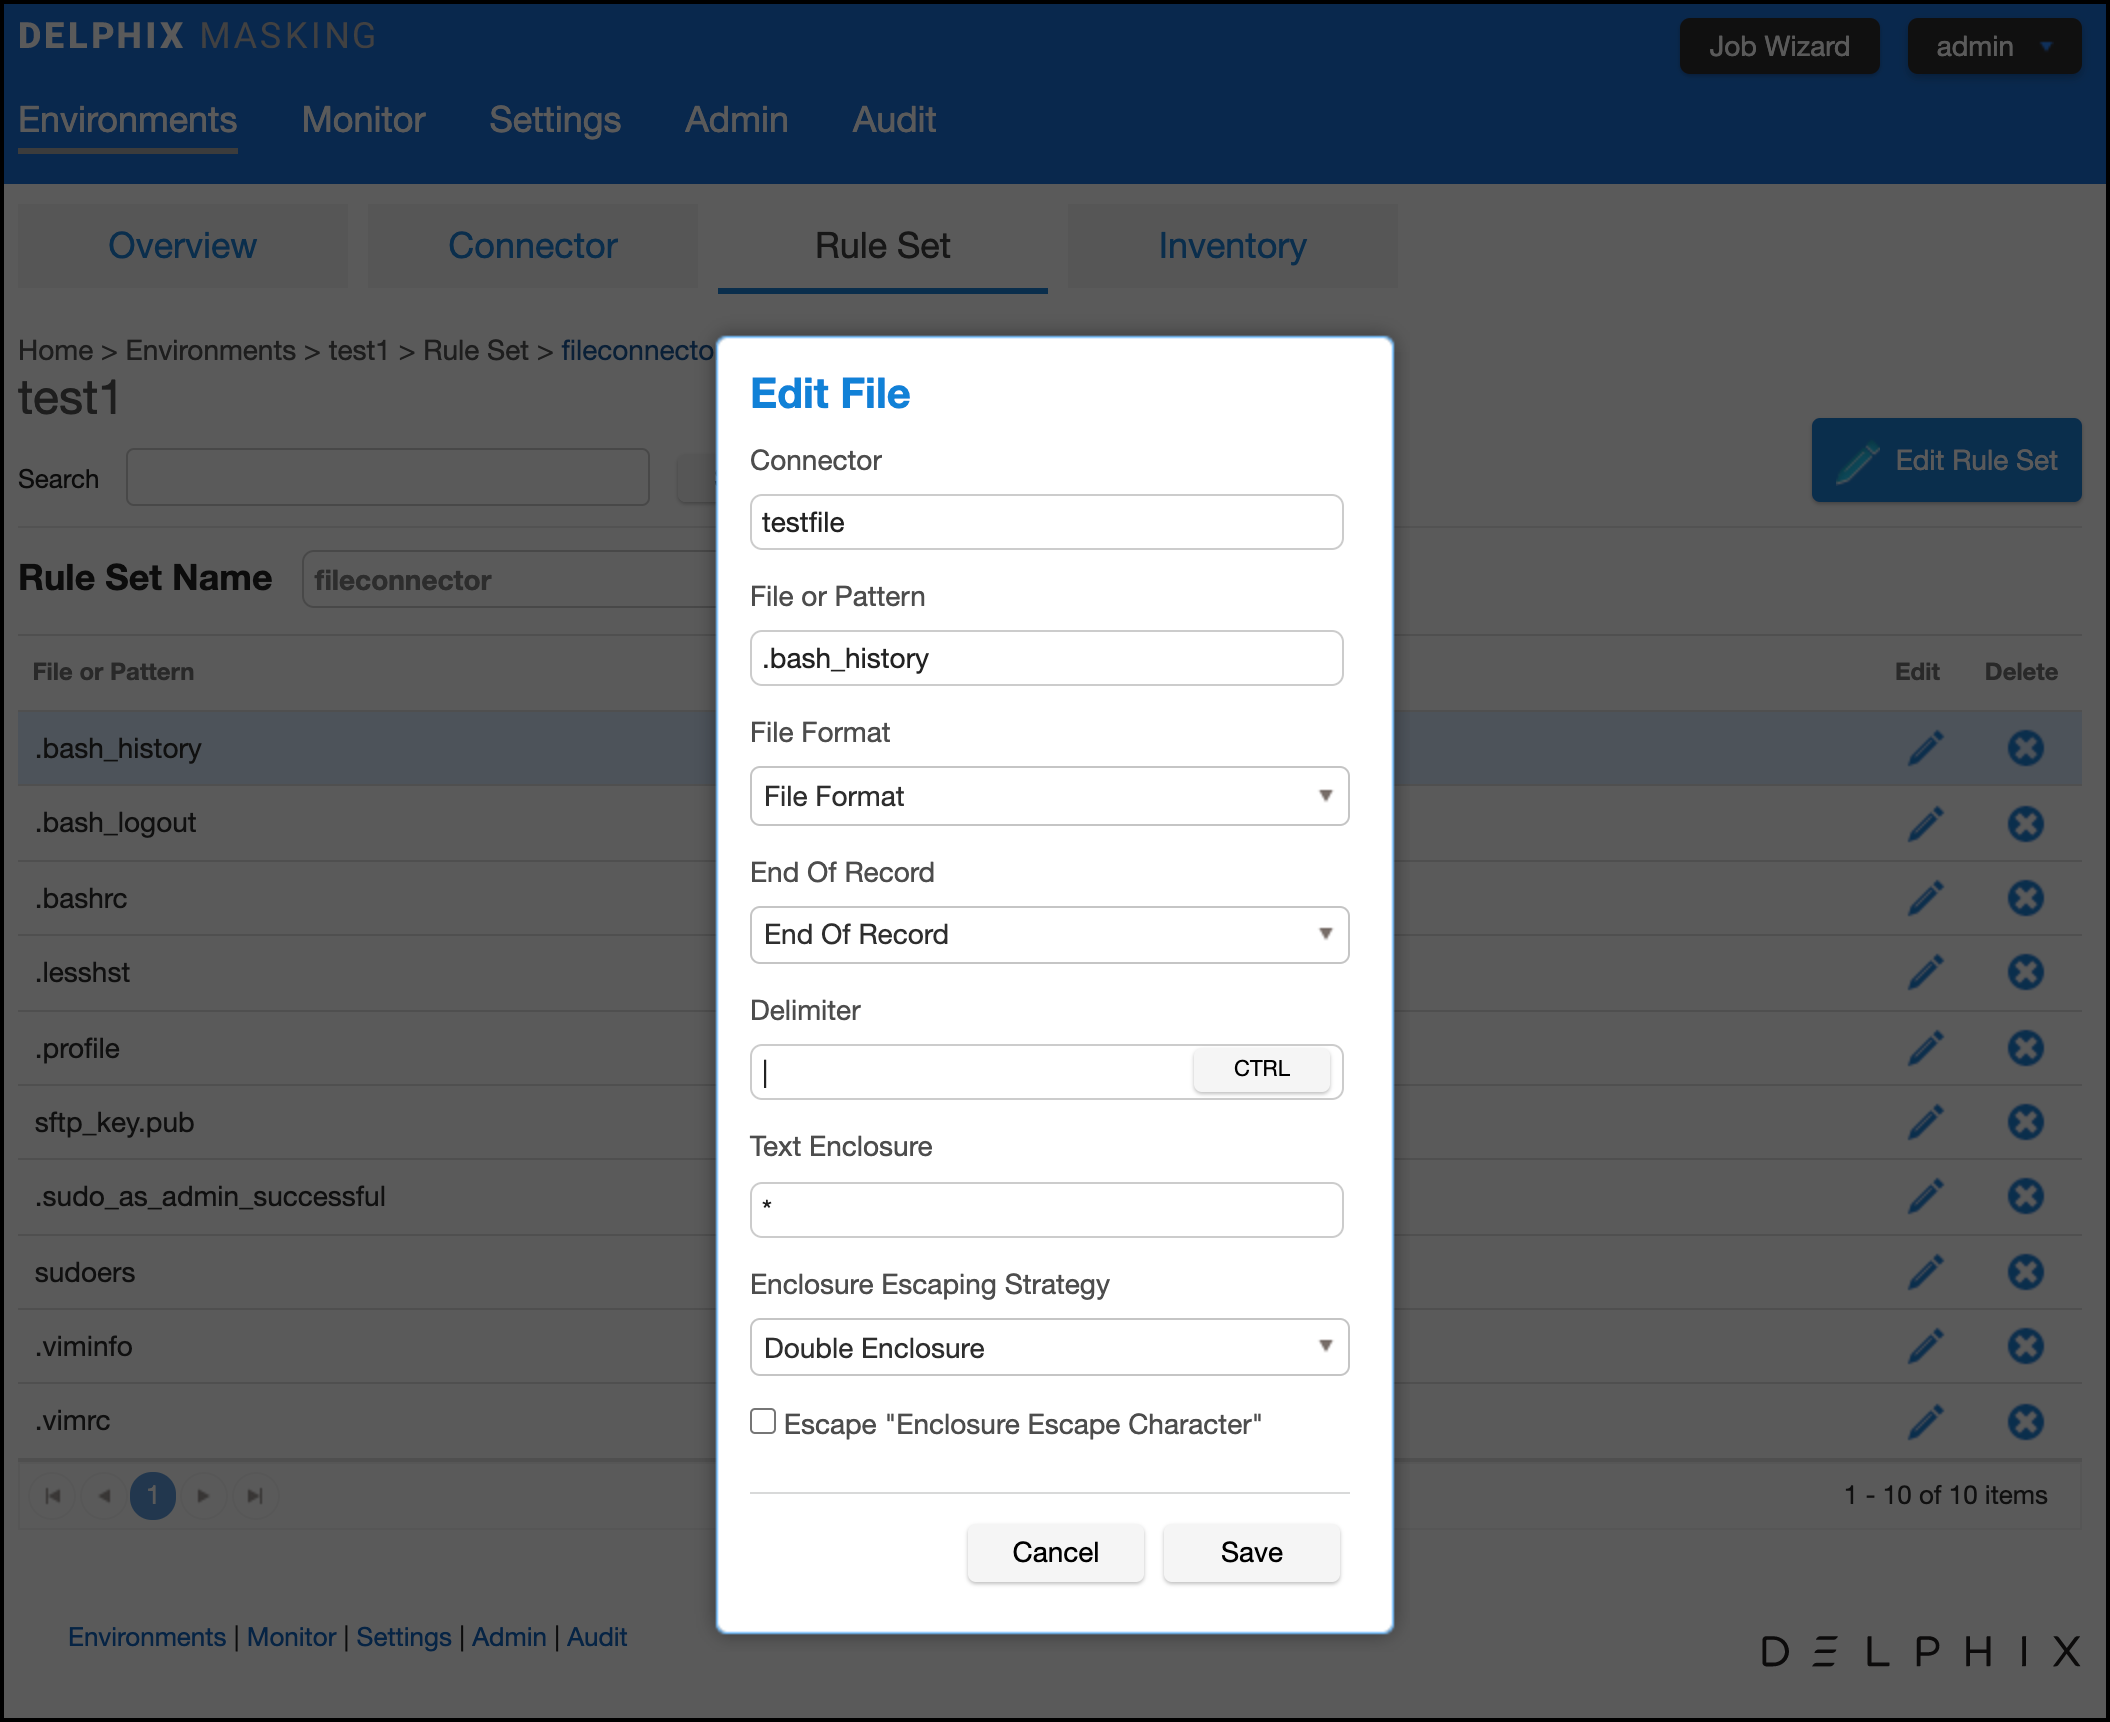
2. Custom
By selecting custom option user can specify any single character as an enclosure escape character except the "escape sequences" and "control characters".

NOTE - Default Enclosure Escape Character
The default value for "Enclosure Escaping Strategy" is "Double Enclosure".
Escape "Enclosure Escape Character"
Selecting this checkbox indicates whether the enclosure escape character also escapes itself. For example, if the enclosure escape character is " then the sequence "" would be treated as a single " character, rather than an escape.
Configure enclosure escape character for the large ruleset
To configure the enclosure escape character for the large ruleset user can use this API Script.